Spring Boot 整合 Thymeleaf 配置 Web 案例
Thymeleaf 是一种模板语言。那模板语言或模板引擎是什么?常见的模板语言都包含以下几个概念:数据(Data)、模板(Template)、模板引擎(Template Engine)和结果文档(Result Documents)。
- 数据 数据是信息的表现形式和载体,可以是符号、文字、数字、语音、图像、视频等。数据和信息是不可分离的,数据是信息的表达,信息是数据的内涵。数据本身没有意义,数据只有对实体行为产生影响时才成为信息。
- 模板 模板,是一个蓝图,即一个与类型无关的类。编译器在使用模板时,会根据模板实参对模板进行实例化,得到一个与类型相关的类。
- 模板引擎 模板引擎(这里特指用于Web开发的模板引擎)是为了使用户界面与业务数据(内容)分离而产生的,它可以生成特定格式的文档,用于网站的模板引擎就会生成一个标准的HTML文档。
- 结果文档 一种特定格式的文档,比如用于网站的模板引擎就会生成一个标准的HTML文档。
模板语言用途广泛,常见的用途如下:
- 页面渲染
- 文档生成
- 代码生成
- 所有 “数据+模板=文本” 的应用场景
这里案例用途自然是 页面渲染,下面在 Spring Boot 中整合 Thymeleaf 实现完整 Web 案例。
一、运行 chapter-2-spring-boot-quick-start
chapter-2-spring-boot-quick-start 工程用的是内存式数据库,不需要配置数据源。下载运行即可。
1.下载工程
git clone 下载工程 springboot-learning-example ,项目地址见 GitHub:https://github.com/JeffLi1993/springboot-learning-example ,即:
git clone https://github.com/JeffLi1993/springboot-learning-example.git
2.工程结构
用 IDEA 打开工程,可以看到子工程 chapter-2-spring-boot-quick-start ,其目录如下:
    ├── pom.xml
    └── src
        ├── main
        │   ├── java
        │   │   └── spring
        │   │       └── boot
        │   │           └── core
        │   │               ├── QuickStartApplication.java
        │   │               ├── domain
        │   │               │   ├── User.java
        │   │               │   └── UserRepository.java
        │   │               ├── service
        │   │               │   ├── UserService.java
        │   │               │   └── impl
        │   │               │       └── UserServiceImpl.java
        │   │               └── web
        │   │                   └── UserController.java
        │   └── resources
        │       ├── application.properties
        │       ├── static
        │       │   ├── css
        │       │   │   └── default.css
        │       │   └── images
        │       │       └── favicon.ico
        │       └── templates
        │           ├── userForm.html
        │           └── userList.html
        └── test
            └── java
                └── spring
                    └── boot
                        └── core
                            ├── QuickStartApplicationTests.java
                            └── domain
                                └── UserRepositoryTests.java
对应目录:
- org.spring.springboot.controller - Controller 层
- org.spring.springboot.dao - 数据操作层 DAO
- org.spring.springboot.domain - 实体类
- org.spring.springboot.service - 业务逻辑层
- Application - 应用启动类
- application.properties - 应用配置文件
模板是会用到下面两个目录
- static 目录是存放 CSS、JS 等资源文件
- templates 目录是存放视图
3.编译运行工程
在该工程根目录,运行 maven 指令进行编译:
    cd chapter-2-spring-boot-quick-start
    mvn clean install
编译工程成功后,右键运行名为 QuickStartApplication.java 应用启动类的 main 函数,然后浏览器访问 localhost:8080/users 即可:
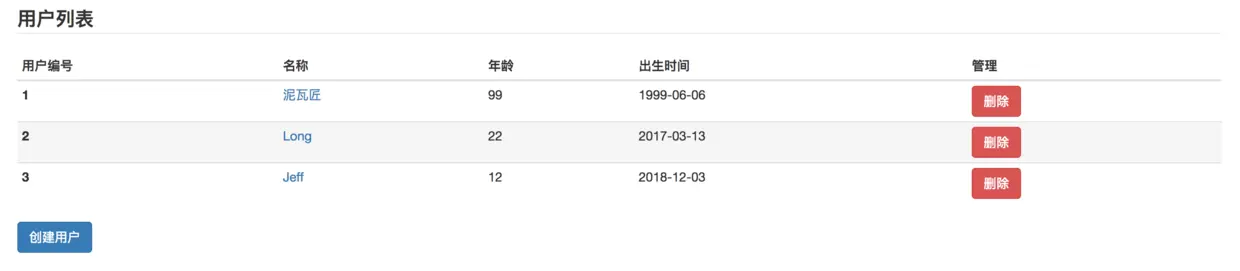
用户列表页面:
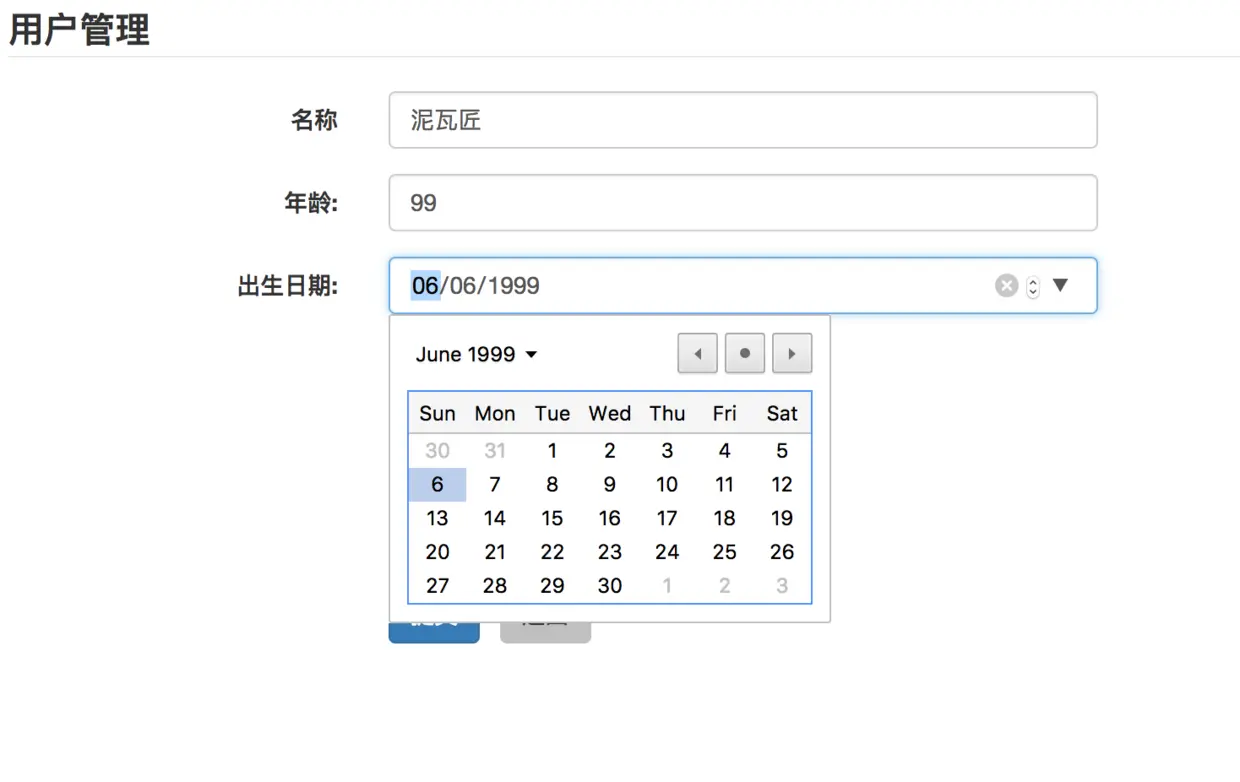
用户编辑页面:
二、详解整合 Thymeleaf 工程 chapter-2-spring-boot-quick-start
工程代码:
1. pom.xml Thymeleaf 依赖
使用模板引擎,就在 pom.xml 加入 Thymeleaf 组件依赖:
    <!-- 模板引擎 Thymeleaf 依赖 -->
    <dependency>
        <groupId>org.springframework.boot</groupId>
        <artifactId>spring-boot-starter-thymeleaf</artifactId>
    </dependency>
Thymeleaf 是什么?
Thymeleaf is a modern server-side Java template engine for both web and standalone environments. Thymeleaf’s main goal is to bring elegant natural templates to your development workflow — HTML that can be correctly displayed in browsers and also work as static prototypes, allowing for stronger collaboration in development teams.
Thymeleaf 是新一代 Java 模板引擎,在 Spring 4 后推荐使用。 整体个 pom.xml 配置如下:
    <?xml version="1.0" encoding="UTF-8"?>
    <project xmlns="http://maven.apache.org/POM/4.0.0" xmlns:xsi="http://www.w3.org/2001/XMLSchema-instance"
             xsi:schemaLocation="http://maven.apache.org/POM/4.0.0 http://maven.apache.org/xsd/maven-4.0.0.xsd">
        <modelVersion>4.0.0</modelVersion>

        <groupId>spring.boot.core</groupId>
        <artifactId>chapter-2-spring-boot-quick-start</artifactId>
        <version>0.0.1-SNAPSHOT</version>
        <packaging>jar</packaging>

        <name>chapter-2-spring-boot-quick-start</name>
        <description>第二章快速入门案例</description>

        <parent>
            <groupId>org.springframework.boot</groupId>
            <artifactId>spring-boot-starter-parent</artifactId>
            <version>1.5.7.RELEASE</version>
        </parent>

        <properties>
            <project.build.sourceEncoding>UTF-8</project.build.sourceEncoding>
            <project.reporting.outputEncoding>UTF-8</project.reporting.outputEncoding>
            <java.version>1.8</java.version>
        </properties>

        <dependencies>

            <!-- Web 依赖 -->
            <dependency>
                <groupId>org.springframework.boot</groupId>
                <artifactId>spring-boot-starter-web</artifactId>
            </dependency>

            <!-- 单元测试依赖 -->
            <dependency>
                <groupId>org.springframework.boot</groupId>
                <artifactId>spring-boot-starter-test</artifactId>
                <scope>test</scope>
            </dependency>

            <!-- Spring Data JPA 依赖 :: 数据持久层框架 -->
            <dependency>
                <groupId>org.springframework.boot</groupId>
                <artifactId>spring-boot-starter-data-jpa</artifactId>
            </dependency>

            <!-- h2 数据源连接驱动 -->
            <dependency>
                <groupId>com.h2database</groupId>
                <artifactId>h2</artifactId>
                <scope>runtime</scope>
            </dependency>

            <!-- 模板引擎 Thymeleaf 依赖 -->
            <dependency>
                <groupId>org.springframework.boot</groupId>
                <artifactId>spring-boot-starter-thymeleaf</artifactId>
            </dependency>
        </dependencies>

        <build>
            <plugins>
                <!-- Spring Boot Maven 插件 -->
                <plugin>
                    <groupId>org.springframework.boot</groupId>
                    <artifactId>spring-boot-maven-plugin</artifactId>
                </plugin>
            </plugins>
        </build>

    </project>
2. Thymeleaf 依赖配置
在 Spring Boot 项目中加入 Thymeleaf 依赖,即可启动其默认配置。如果想要自定义配置,可以在 application.properties 配置如下:
    spring.thymeleaf.cache=true # Enable template caching.
    spring.thymeleaf.check-template=true # Check that the template exists before rendering it.
    spring.thymeleaf.check-template-location=true # Check that the templates location exists.
    spring.thymeleaf.enabled=true # Enable Thymeleaf view resolution for Web frameworks.
    spring.thymeleaf.encoding=UTF-8 # Template files encoding.
    spring.thymeleaf.excluded-view-names= # Comma-separated list of view names that should be excluded from resolution.
    spring.thymeleaf.mode=HTML5 # Template mode to be applied to templates. See also StandardTemplateModeHandlers.
    spring.thymeleaf.prefix=classpath:/templates/ # Prefix that gets prepended to view names when building a URL.
    spring.thymeleaf.reactive.max-chunk-size= # Maximum size of data buffers used for writing to the response, in bytes.
    spring.thymeleaf.reactive.media-types= # Media types supported by the view technology.
    spring.thymeleaf.servlet.content-type=text/html # Content-Type value written to HTTP responses.
    spring.thymeleaf.suffix=.html # Suffix that gets appended to view names when building a URL.
    spring.thymeleaf.template-resolver-order= # Order of the template resolver in the chain.
    spring.thymeleaf.view-names= # Comma-separated list of view names that can be resolved.
3.Thymeleaf 使用
Controller 如何将 View 指向 Thymeleaf
用户控制层代码如下:
    @Controller
    @RequestMapping(value = "/users")     // 通过这里配置使下面的映射都在 /users
    public class UserController {

        @Autowired
        UserService userService;          // 用户服务层

        /**
         *  获取用户列表
         *    处理 "/users" 的 GET 请求,用来获取用户列表
         *    通过 @RequestParam 传递参数,进一步实现条件查询或者分页查询
         */
        @RequestMapping(method = RequestMethod.GET)
        public String getUserList(ModelMap map) {
            map.addAttribute("userList", userService.findAll());
            return "userList";
        }

        /**
         * 显示创建用户表单
         *
         */
        @RequestMapping(value = "/create", method = RequestMethod.GET)
        public String createUserForm(ModelMap map) {
            map.addAttribute("user", new User());
            map.addAttribute("action", "create");
            return "userForm";
        }

        /**
         *  创建用户
         *    处理 "/users" 的 POST 请求,用来获取用户列表
         *    通过 @ModelAttribute 绑定参数,也通过 @RequestParam 从页面中传递参数
         */
        @RequestMapping(value = "/create", method = RequestMethod.POST)
        public String postUser(@ModelAttribute User user) {
            userService.insertByUser(user);
            return "redirect:/users/";
        }

        /**
         * 显示需要更新用户表单
         *    处理 "/users/{id}" 的 GET 请求,通过 URL 中的 id 值获取 User 信息
         *    URL 中的 id ,通过 @PathVariable 绑定参数
         */
        @RequestMapping(value = "/update/{id}", method = RequestMethod.GET)
        public String getUser(@PathVariable Long id, ModelMap map) {
            map.addAttribute("user", userService.findById(id));
            map.addAttribute("action", "update");
            return "userForm";
        }

        /**
         * 处理 "/users/{id}" 的 PUT 请求,用来更新 User 信息
         *
         */
        @RequestMapping(value = "/update", method = RequestMethod.POST)
        public String putUser(@ModelAttribute User user) {
            userService.update(user);
            return "redirect:/users/";
        }

        /**
         * 处理 "/users/{id}" 的 GET 请求,用来删除 User 信息
         */
        @RequestMapping(value = "/delete/{id}", method = RequestMethod.GET)
        public String deleteUser(@PathVariable Long id) {

            userService.delete(id);
            return "redirect:/users/";
        }

    }
ModelMap 对象来进行数据绑定到视图。return 字符串,该字符串对应的目录在 resources/templates 下的模板名字。 @ModelAttribute 注解是用来获取页面 Form 表单提交的数据,并绑定到 User 数据对象。
Form 表单页面
核心代码:
    <form th:action="@{/users/{action}(action=${action})}" method="post" class="form-horizontal">

                    <input type="hidden" name="id" th:value="${user.id}"/>

                    <div class="form-group">
                        <label for="user_name" class="col-sm-2 control-label">名称</label>
                        <div class="col-xs-4">
                            <input type="text" class="form-control" id="user_name" name="name" th:value="${user.name}" />
                        </div>
                    </div>

                    <div class="form-group">
                        <label for="user_age" class="col-sm-2 control-label">年龄:</label>
                        <div class="col-xs-4">
                            <input type="text" class="form-control" id="user_age" name="age" th:value="${user.age}"/>
                        </div>
                    </div>

                    <div class="form-group">
                        <label for="user_birthday" class="col-sm-2 control-label">出生日期:</label>
                        <div class="col-xs-4">
                            <input type="date" class="form-control" id="user_birthday" name="birthday" th:value="${user.birthday}"/>
                        </div>
                    </div>

                    <div class="form-group">
                        <div class="col-sm-offset-2 col-sm-10">
                            <input class="btn btn-primary" type="submit" value="提交"/>
                            <input class="btn" type="button" value="返回" onclick="history.back()"/>
                        </div>
                    </div>
                </form>
这里定义了一个 Form 表单用于新增或者更新用户。
列表页面
代码如下:
    <table class="table table-hover table-condensed">
                    <legend>
                        <strong>用户列表</strong>
                    </legend>
                    <thead>
                        <tr>
                            <th>用户编号</th>
                            <th>名称</th>
                            <th>年龄</th>
                            <th>出生时间</th>
                            <th>管理</th>
                        </tr>
                    </thead>
                    <tbody>
                        <tr th:each="user : ${userList}">
                            <th scope="row" th:text="${user.id}"></th>
                            <td><a th:href="@{/users/update/{userId}(userId=${user.id})}" th:text="${user.name}"></a></td>
                            <td th:text="${user.age}"></td>
                            <td th:text="${user.birthday}"></td>
                            <td><a class="btn btn-danger" th:href="@{/users/delete/{userId}(userId=${user.id})}">删除</a></td>
                        </tr>
                    </tbody>
                </table>
这里循环了用户列表。
Tymeleaf 的语法糖
我这边也就不详细展开了,看看官方文档 http://www.thymeleaf.org/documentation.html
三、本文小结
该文,利用 Thymeleaf 做了个 Web 的 CRUD 案例。大家多指教~
如以上文章或链接对你有帮助的话,别忘了在文章结尾处评论哈~ 你也可以点击页面右边“分享”悬浮按钮哦,让更多的人阅读这篇文章。
代码示例。本文示例读者可以通过查看下面仓库的中代码 :
- GitHub springboot-learning-example https://github.com/JeffLi1993/springboot-learning-example
- Gitee springboot-learning-example https://gitee.com/jeff1993/springboot-learning-example
如果您对这些感兴趣,欢迎 star、follow、收藏、转发给予支持!
🔥🔥 点击领取 ChatGPT Plus 正版账号
本作品采用 知识共享署名-非商业性使用-禁止演绎 4.0 国际许可协议 (CC BY-NC-ND 4.0) 进行许可。